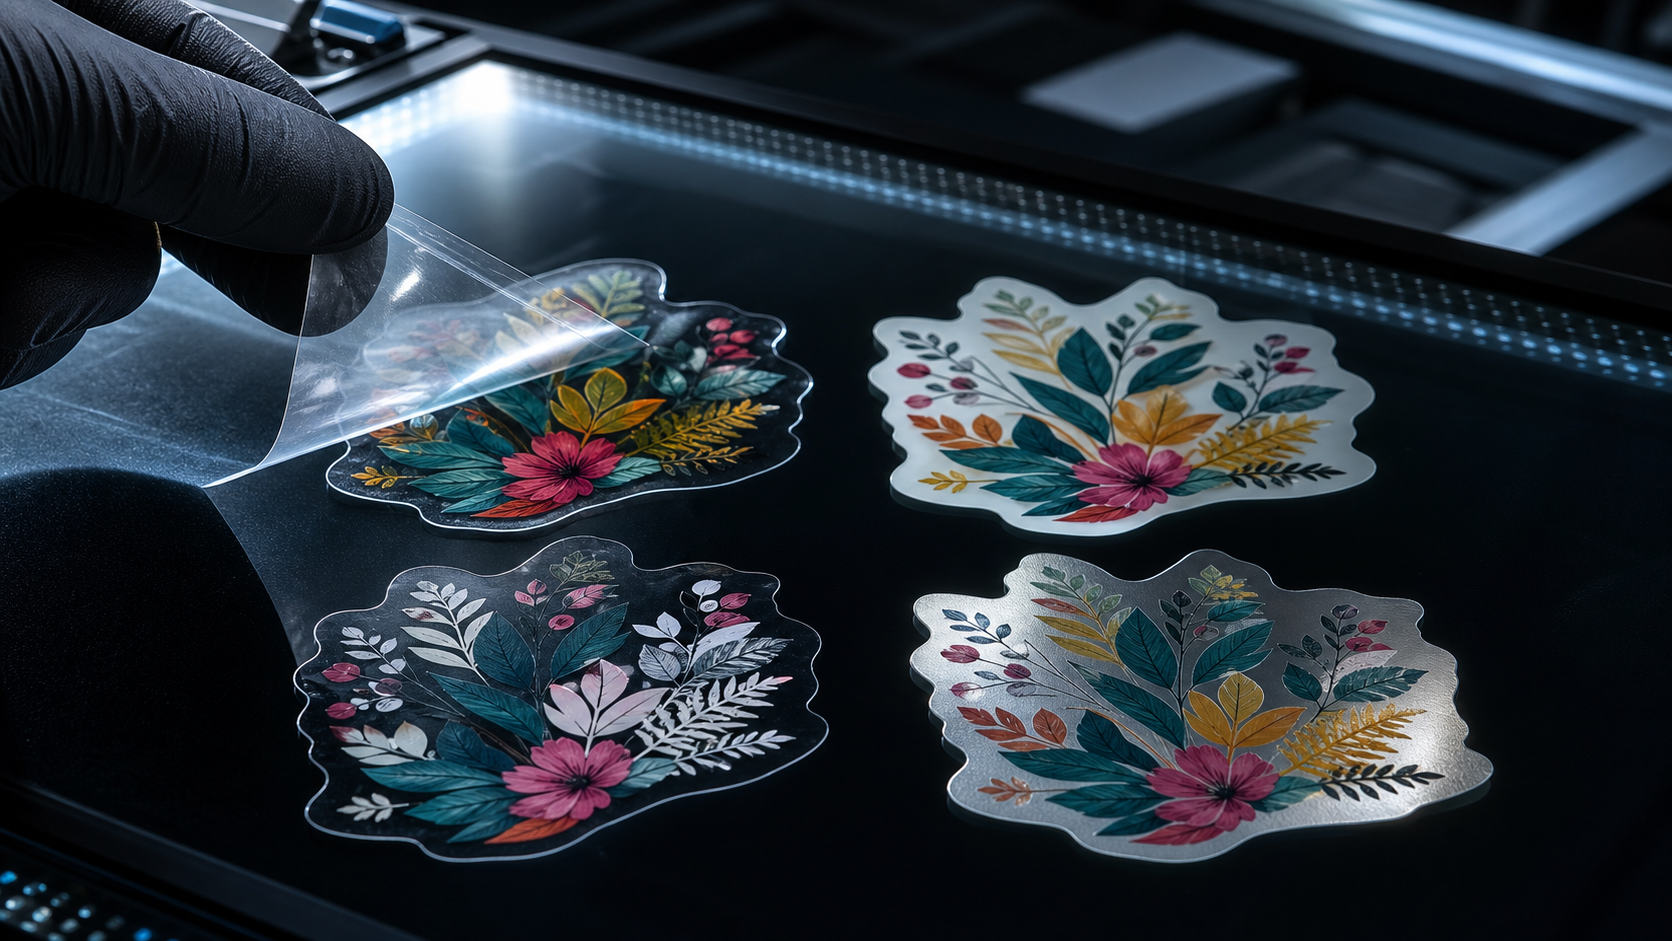
White ink acts as an opaque base or visible design color on transparent, holographic, and metallic stocks. Without it, ordinary colors can look translucent, darker, or strongly affected by whatever sits behind the sticker.
Why ordinary inks look translucent on clear material
On clear stickers, colored inks do not have a white paper background behind them. Light passes through the printed areas, bounces off the surface underneath, and changes the way the color appears.
What a white underbase does
A white underbase is a printed white layer placed below color artwork. It makes selected colors more opaque and closer to how they would appear on white material.
White Ink Setup Results
| Setup | Clear stock appearance | Metallic stock appearance | Best use |
|---|---|---|---|
| No white | Transparent, background affects color | Reflective shine shows through | Subtle effects |
| Full white underbase | Colors look more solid | Colors cover most reflection | Logos and readable artwork |
| Selective white | Some areas solid, some transparent | Controlled mix of ink and shine | Premium labels |
| White-only details | Clean white graphics | White contrasts with metallic base | Minimal marks |
Four ways to use white ink
No white layer keeps the design transparent or metallic. A full white underbase makes most of the design read like it is printed on white stock. Selective white keeps some areas opaque and lets other areas remain see-through or reflective.
How to prepare a white-ink layer
Follow your printer's template instead of guessing a universal file name. Many workflows use a separate spot color, layer, or mask to define where white ink should print, but naming rules vary.
Common proofing mistakes
The most common mistake is approving a digital proof without thinking about the background. A clear sticker displayed on a white PDF page can look more opaque than it will on a real bottle, window, or dark package.
FAQ
Do clear stickers need white ink?
Not always. They need white ink when important colors, logos, or text must stay opaque.
Can white ink be printed on metallic stickers?
Yes, when the production process supports it. White can block reflection under selected areas.
Should the whole design get a white underbase?
Only if you want the whole design to look solid. Selective white often gives better control.
Ready to prepare your sticker project?
Share your transparent or metallic artwork and ask which areas need a white layer. Contact StickerJaki for custom sticker support: /custom/
How to turn the idea into a production-ready brief
For transparent or reflective stickers, the strongest decision is the one that can be checked before production. Treat white ink stickers as a production planning topic, not only a design preference. Your brief should explain the product, the surface, the expected use environment, the quantity range, and the parts of the artwork that cannot change. Add notes about clear film, metallic stock, underbase, opacity so the production team knows what to review first.
A useful brief is specific without being overcomplicated. Instead of saying that the sticker should look premium, explain the finish, size, viewing distance, packaging surface, and whether the customer needs to scan, read, peel, collect, or display the sticker. Those details shape material choice, file setup, and proofing.
Questions to answer before asking for a quote
- What surface or package will the sticker be applied to?
- Will the sticker be decorative, functional, promotional, or regulatory?
- Which part of the artwork is brand-critical or technically sensitive?
- What quantity range is being tested now, and what could be reordered later?
- Does the buyer need one design, multiple variants, or future monthly updates?
These questions help prevent vague quotes. They also make it easier to compare options because every supplier is responding to the same production situation. When the use case is clear, the discussion can move from abstract price shopping to practical fit.
What to check in the artwork file
Artwork for white ink stickers should be reviewed at final size. Small type, thin lines, complex patterns, QR codes, white layers, dense colors, and cut paths can all behave differently when the file moves from screen to material. Zooming in is helpful for technical inspection, but zooming out is just as important because buyers need to know what a customer will actually notice first.
Check that text is outlined or packaged correctly, images are high enough resolution, bleed extends beyond the cut line, and the safe area keeps important information away from the edge. If several versions are involved, confirm that each file has a clear name and that obsolete versions are removed from the approval folder.
Material, finish, and real-use testing
Material choice changes the result as much as artwork does. A glossy film, matte label, transparent stock, metallic base, or textured paper can shift the look and performance of transparent or reflective stickers. Adhesive and finish should be chosen for the surface and handling conditions, not just for how the mockup looks.
When the sticker will face moisture, cold, oil, rubbing, sunlight, curved packaging, or repeated handling, a real-use test is worth more than a perfect screen preview. Apply a sample to the actual surface, wait long enough to reveal edge lift or color issues, and check the result under the lighting where the product will be seen.
How to review the proof without missing the obvious
Proof approval should be slow and boring in the best way. Read every word, check every number, confirm the size, inspect the cut line, compare the quantity, and make sure the correct version is attached. Many expensive mistakes are not exotic print failures; they are old filenames, wrong SKUs, missing bleed, or a last-minute copy change that never reached the final proof.
For white ink stickers, the proof should also be checked against the original business goal. If the goal is readability, test readability. If the goal is shelf impact, view it at shelf distance. If the goal is production consistency across variants, compare the variants side by side instead of approving each one in isolation.
Common mistakes that slow down production
- Approving a mockup instead of the production file.
- Sending several file versions without naming the final one clearly.
- Ignoring the surface, storage condition, or application method.
- Using color as the only identifier for variants or warnings.
- Changing copy after proof approval without restarting the check.
A clean process does not remove creativity. It protects it. The more precisely the production details are handled, the more freedom the design has to work as intended when it becomes a real sticker, label, seal, or packaging element.
A practical approval workflow
Start with one owner for the final file and one owner for the final business approval. Collect feedback in one place, resolve contradictions, and avoid sending piecemeal comments through multiple channels. Once the artwork is ready, ask for a proof, review it against the checklist, and only then approve production.
That workflow is especially useful for transparent or reflective stickers, where design details and production details meet. It gives the buyer a repeatable way to move from idea to approved order without relying on memory or guesswork.
Final buyer checklist before production
Before a sticker or label project moves into production, the buyer should be able to explain the goal of the piece in one sentence. Is it meant to identify a product, protect a package, decorate a surface, support a campaign, or test a new product idea? That goal determines which details deserve the most attention during proofing.
- Confirm the final size and whether the artwork is viewed up close, at shelf distance, or in a photo.
- Check material and finish against the actual surface, storage condition, and handling environment.
- Review every text field, code, variant name, color cue, and production note against the latest source file.
- Make sure the approved proof, image reference, and quantity all describe the same version.
- Keep a simple record of what was approved so future reorders do not restart from guesswork.
This checklist is intentionally practical. Most production issues are not caused by one dramatic mistake; they come from several small assumptions stacking up. A color is assumed to match the screen, a label is assumed to fit the curve, a version is assumed to be final, or a proof is approved before someone checks the small text. Slowing down at the approval stage usually saves more time than it costs.
For B2B sticker and label buyers, the best results come from treating artwork, material, proofing, and reorder planning as one connected workflow. A clear workflow helps the supplier recommend the right production route, and it gives the buyer a reliable way to approve the project with confidence.
Buyer Notes for White Ink on Clear and Metallic Stickers: When You Need an Underbase
For sticker sourcing, buyers should consider product format, finish, carton quantity, packaging style, and whether the design fits the intended retail or promotional use. StickerJaki focuses on carton-based wholesale supply, with standard product orders following MOV $200. Custom sticker pricing depends on the product type, material, finish, packaging, and quantity.
Sticker products can look similar online, but commercial results often depend on details such as adhesive choice, finish, packaging, sheet layout, and carton quantity. Buyers should match those specifications to the selling channel before choosing a product.
Quick sourcing checklist
- Define where and how the sticker will be used
- Compare material, finish, packaging, and carton quantity
- Use custom quoting when standard products do not match the project
For readers comparing options, the best next step is to move from general research to the right product or quote path. Useful resources: Wholesale sticker products · 3D relief stickers wholesale · Custom sticker manufacturing.
If the standard product range does not match the exact design, packaging, or application requirement, a custom quote is usually the better path. In that case, prepare the artwork, expected quantity, target material, finish, and packing method before contacting the supplier.